The Branding Process

& Requirements

What we need from you, the process and some info on branding.

Getting your job ordered.

Step 1.

Decide what you need. We can help with advice on what garments and branding type is right for your job.
See our Services

Step 2.

Get a quote. Our instant estimate form on the front page will give you an idea of the pricing based on our most commonly requested items. However we supply hundreds of garments from dozens of suppliers so let us know what you need.
See Pricing 

Step 3.

Send us your artwork and we proof. We require print ready Vector artwork, single colour artwork (when it doesn’t require a base ink, can be raster – this must be 300ppi at the size req), not all raster files work – SEE BELOW.

Step 4.

Approve the proof and supply final numbers. 

Step 5.

We schedule, print your job and arrange a courier (unless you are collecting). 

Step 6.

This is all in your hands now. Either hand out the apparel to your team, fulfill prorders or get selling or get your promo moving.

A quick note about pricing and sizes:
The pricebreak is based on total prints of a single design at one time. As such you can mix singlets, hoodies and tees and this would count towards the larger total.

However this also means you need to be aware of the sizing when designing, if your design needs to be one size on adults and one size on kids this would effectively double the setup fee and split the pricebreak quantity. We recommend working as large as possible on the smallest garment.

What we need from you

The below sections go into detail however the things we need are:

• Vector Artwork, we can send your artwork to be redrawn for a fee.
• Pantone Colour, numbers to match colours to.
• Desired Positioning and Sizing


We will then need your quantities and size break down and delivery address.

Vector Artwork

We require Vector Artwork to produce quality work.

This  image shows part of the story why we need Vector artwork – Quality – But not the whole thing. Vector artwork is generally made from scratch in Illustrator or Corel Draw.

Vector artwork allows us to resize, and select individual elements. This means colours separation is easier and we can make basic alterations without charging!

There are rare occasions where Raster Artwork is fine, however this is generally only for basic images and where the image is very high resolution (300ppi @ size required) and single colour – and without the need for Trapping (ie Black on White). Otherwise pixelation and other issues will likely occur – If you zoom in and it looks awful on screen, it will look awful when printed.

Most of the time you should aim to provide Vector Artwork . Preferably in a .pdf format. If you cannot supply this – check with any printers that may have printed Business Cards or Signs.

https://design.vectr.com/tutorials/what-are-vector-graphics/

https://artistshopshelp.threadless.com/article/787-vector-vs-raster

If you cannot supply required artwork format:
The first step is to Contact your marketing team or designer – generally speaking Branding Guide files will have vector artwork in them. 

Vector artwork is part of the curriculum for any design course – outside of web only courses (though this is changing with SVGs growing in popularity) so while all design agencies will understand and produce primarily in Vector (aside from photos etc)  your web designer may only have a basic understanding of print.

If you are having issues contacting your designer we can send art off for Redrawing for a fee – Otherwise services such as UpWork, Fiverr and Freelancer have services to prep your artwork.
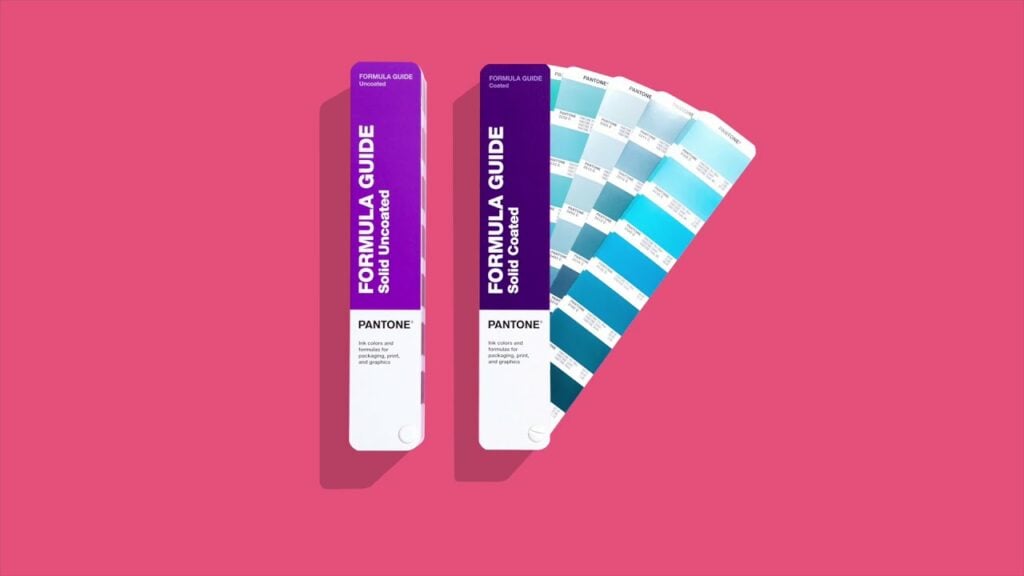
Pantone Colours 

Every computer screen is different, to get around this we match to the Pantone Colour Matching System (Solid Colours).

We match to Pantone Colours, without these being provided we can approximate to screen, any variance or issues arising from this on the first or further runs is the at the clients risk.

It is likely your designer has these on file!

CMYK

Even if you do not know your Pantone Colour it is best if you work in CMYK. Full Colour images should always be set to CMYK.
RGB  is for web design and things that will be seen on screens, it is a backlit system and produces colours that cannot be achieved through any form of conventional printing.

We will provide a proof on your requested garments before we go to print, your job will not be printed or scheduled until this is approved.
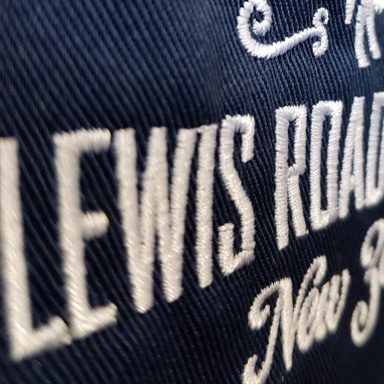
Vector Artwork

We prefer vector artwork as this allows us to resize to better digitise your artwork – However the process is different for embroidery as it needs to be Digitised.

However this is not essential, a high res Raster file is fine for us to have artwork digitised from. 

Madeira Thread Colour

Every computer screen is different, to get around this we match to the Madeira Thread system.

Your designer might have this one file.

or Pantone Solid C/U number

If we need to set a Madeira thread colour. Every computer screen is different, to get around this we match to the Pantone Colour Matching System (Solid Colours) – Madeira have a guide on how to convert this to (close) Thread Colours.

Before your job is Scheduled we will need your confirmed styles and numbers, once you provide these your job will be scheduled to print.

You can change these, however it will push your job out and a restocking fee may apply depending on what supplier we are using for your job.

It is best if you collate this and provide it once.

To proceed we need Proof approval and Final Quantity 

Once these are provided your job is locked and loaded.
Before collection or courier we will requirement payment, we do have credit card options available.

If we are couriering the garments to you we will need a delivery address! Unless you are collecting.

We can do split deliveries, however there is a $10.00 per split (after the first address) fee – and additional courier fees.

The proofing Process

 We are a Direct to Business printer. We supply garments and brand.

We do not have a dedicated designer on staff – Our clients either supply their artwork ready to go, or supply their logo and text and we proof these in the positions they specify.
You will receive  a complimentary proof to show each print colour and each print size only, not every single combination possible.

We are a commercial branding facility and our pricing is based on us supplying and branding garments.

To assist with this we do have requirements for artwork supply.

To ensure you get what you are expecting we require some information along with your print ready artwork this includes: Colours, Print Positions, Sizing and Positioning if you have a specific requirement.

Our printers print 10’s of thousands of garments, they can and do position using standard positioning and adjust this depending on your artwork.

To help you understand this we have put together a PDF available to the right and a section on Screen Printing below so you can see the process. 

Above is a picture from our proofing requirements page, you can see the full pdf by clicking below. 

See our proofing requirements pdf by clicking here

A Couple of quick notes:
1. Sides of garments will wrap
, as such proofed artwork may look smaller than when worn – We recommend using a ruler to let us know the size you want.

2. When on the print machine the positioning is set by the neck/shoulders, the majority of the shirt is not visible (see section below) so please specify specific height requirements from the neck down. 

The printing process

How we brand your garments depends on a few factors, such as quantity, garment and process required.

The units we use for larger runs are semi-automatic and are far larger than what is shown here, but the process is essentially the same. We do also print small jobs manually.

However if you want to learn more or see the entire process the guys at ryonet have a great video library. This video here has a fantastic overview of the process we follow. 

The most common branding we do, particularly on tees, is Screen Printing.
Whether this is done  on one of our semi-automatic machines or entirely by hand the premise is exactly the same.

First a screen is imaged for each colour in the design.
Screens are frames with very fine mesh (originally made from silk, hence silk screenprinting) 

The screens are then loaded onto a machine and lined up.
The screens are loaded onto individual heads, which the printer swings around.

The screens are then inked up and using a squeege ink is pushed through the screen.
If the job is multi-colour the printer will print one colour, swing the heads to change screens and then push the next colour through.

When printing a base or when a design needs the inks to be ‘flashed’ the stations with the garments is also spun so that the garment is under an element for a brief time to quickly flash cure the ink before the next layer goes on.

If there is a print colour change, the screens have to be cleaned and re-inked.

Finally the garments are then run through a conveyer drier to cure.
They are then stacked out, folded and boxed ready to be collected or couriered.

Positioning
Our printers print hundreds to thousands of garments a week, 99% of jobs are fine at standard positions. If you have a particular ‘target height/distance’, specify this from the neck down.

Please note that this is a target, this is a production process and slight variations are to be expected due to the process, in which loading is manual and at speed (to meet the price point and turnarounds) – Embroidery while expensive can sometimes meet exact positioning.

Quality of garment also plays into this, as all garments are hand sewn any variance will result in a slightly different print position as the position is mechanical whilst the loading and garments are more manual. This is why we tend to recommend AS Colour. Even the best shirts will have slight shape differences which affect positioning.

we do not generally do different distances across sizes, (unless the job has 50+ of each size/position). And it is warranted by the job.

Screen Printing T-Shirts

Whilst t-shirts are simple, we do print the backs of hoodies 180-200mm down to allow for the hood.

custom branded symbols

Most common methods of branding.

T Shirt printing Example Close Up

Screenprinting

Screenprinting Tees is what we do… Well along Digitals and Embroidery and Vinyl.

Nearly all T-Shirts and Hoodies are Screen Printed, it is the most economical process for printing tees, particularly in higher volumes.

Pricing scales well, and fine detail is acheivable.

Digital T Shirt Transfers

Digital Transfers

Transfers have come a long way, with no limitation to colours they can be the best option for many colours and small runs.


Embroidery Example Close up

Embroidery

Embroidery does not suit soft fabrics such as T-Shirts, however it is perfect for Business Shirts and Polos, as well as Aprons. 

Embroidery is priced per stitch so logos do need to be quoted case by case.

DIFFERENT TYPES OF SCREENPRINTING

We do three main types of printing, there are also several specialist methods and inks we use.

Plastisol Spot Inks

Plastisol is the most common printing method, it is opaque and lasts very well. It is essentially particles held in emulsion.

When printing t-shirts we generally try and stick to Spot Colours, we use Solid Pantone Colours for colour matching.
Spot colours really just refer to a solid colour. They are generally opaque, bright and not victim to variance in between or within jobs.

This means that each colour is completely separate and needs it’s own screen. It also means we can effectively match brand guidelines.

We print using phthalate free inks.

CMYK Process Ink Printing

This differs from Spot Inks as it is a Four Colour process, similar to how brochures and magazines are offset printed it involves 4 Very Fine Screens and vastly less opaque inks. All Colours are made up from CMYK.

This works best on White Garments, and can look good. It is prone to more issues with variance and requires the use of halftones.While you can absolutely have halftones of Spot Colours, where tone is made up of halftone dots.

Haltone Screenprinting is not only for CMYK Prints, but is essential for it.

The entire process is dependant on small dots of colour siting on each other to make up all other colours.

CMYK Screenprinting

You can see on the image to the left the general gist of how this works. Each Screen is made of dots and by putting the colours together you get all of the colours.

This example would have 4 Spot Colours OR CMYK. Either way it is 4 Colours.

It is an actual example shown to a client to explain the process. In this example you would absolutely opt for Spot Colour Printing. Some images have so many colours that CMYK or Digital printing is a must.

CMYK Process printing tends not to be as bright as Spot Colour printing and often digital transfers work better.

Other Specialty Inks

These inks are by definition spot colours.

• Metallic Inks (Gold, Silver Fleck inks)
• Fluro Inks (Hi Vis Yellow, Orange, Pinks etc)
• Glow in the Dark (Covercoat)
• Puff Inks

These inks may have additional costs attached to them, we can also do discharge prints, however we do not do this for small orders as it does necessitate special dryer settings.

Waterbased Screen Printing

A completely different process to Plastisol.
We use waterbased dye inks for Teatowel Printing, this means the pigment sits inside the fabric. They can be used for drying and handling hot items.

This type of waterbased printing needs to go onto light coloured garments.

Water based screen printing.jpg

Hours: 9am – 5pm Mon-Fri by Appointment
74 Morrin Road, Saint Johns
Auckland 1072
PO Box 251166, Pakuranga, Auckland
09 358 1249

If you are requesting a quote or have a question please note we do not provide quotes over the phone. See pricing or submit a quote request here.